Chaos: Don't Stress, Undress

Selective Coloring using Snapseed...
1000022177-jpg.2411185


-Shoot the photo in color.
-Open the photo in Snapseed, go to Tools, select Tune Image.
-Turn the saturation all the way down to 0 and fiddle with anything else while here (Shadows,Light, etc.) Click the checkmark to save progress.
- Click the Edit Stack mark (looks like a curved arrow at the upper right.) Then select View Edits.
- Bottom right now, click on Tune Image, then the square with a paintbrush.
- Far left now, Click the Invert icon. (Looks like a half circle with shading.) Then click the eyeball on the right. The image will shift to red (this helps to see where you're selecting to colorize.) The numbers in the middle should be at zero unless you want a pastel look then tinker around at 25. If you oops while drawing with your fingertip, turn it back to 100 to erase the oops.
- if at any time, you want to see how it's going click the eyeball icon again.
😮‍💨 My fingers are tired now...
 
Selective Coloring using Snapseed...


-Shoot the photo in color.
-Open the photo in Snapseed, go to Tools, select Tune Image.
-Turn the saturation all the way down to 0 and fiddle with anything else while here (Shadows,Light, etc.) Click the checkmark to save progress.
- Click the Edit Stack mark (looks like a curved arrow at the upper right.) Then select View Edits.
- Bottom right now, click on Tune Image, then the square with a paintbrush.
- Far left now, Click the Invert icon. (Looks like a half circle with shading.) Then click the eyeball on the right. The image will shift to red (this helps to see where you're selecting to colorize.) The numbers in the middle should be at zero unless you want a pastel look then tinker around at 25. If you oops while drawing with your fingertip, turn it back to 100 to erase the oops.
- if at any time, you want to see how it's going click the eyeball icon again.
😮‍💨 My fingers are tired now...
Wow, wow, wow. Absolutely stunning!
 
Selective Coloring using Snapseed...


-Shoot the photo in color.
-Open the photo in Snapseed, go to Tools, select Tune Image.
-Turn the saturation all the way down to 0 and fiddle with anything else while here (Shadows,Light, etc.) Click the checkmark to save progress.
- Click the Edit Stack mark (looks like a curved arrow at the upper right.) Then select View Edits.
- Bottom right now, click on Tune Image, then the square with a paintbrush.
- Far left now, Click the Invert icon. (Looks like a half circle with shading.) Then click the eyeball on the right. The image will shift to red (this helps to see where you're selecting to colorize.) The numbers in the middle should be at zero unless you want a pastel look then tinker around at 25. If you oops while drawing with your fingertip, turn it back to 100 to erase the oops.
- if at any time, you want to see how it's going click the eyeball icon again.
😮‍💨 My fingers are tired now...
Absolutely amazing!! You are beautiful and this is a wonderful shot!
 
Wow, wow, wow. Absolutely stunning!
😊 Thank you kindly, hon.
Absolutely amazing!! You are beautiful and this is a wonderful shot!
Thanks! I swear, it's the direct downward angle shot. I couldn't use the ceiling fan like @Lmizzler suggested. I ended up putting a kitchen chair on top of the bed, set a laundry basket ontop of it, extended out the tripod fully to hang off the bed, then used a large throw to hold the tripod down. 😅
 
Selective Coloring using Snapseed...
1000022177-jpg.2411185


-Shoot the photo in color.
-Open the photo in Snapseed, go to Tools, select Tune Image.
-Turn the saturation all the way down to 0 and fiddle with anything else while here (Shadows,Light, etc.) Click the checkmark to save progress.
- Click the Edit Stack mark (looks like a curved arrow at the upper right.) Then select View Edits.
- Bottom right now, click on Tune Image, then the square with a paintbrush.
- Far left now, Click the Invert icon. (Looks like a half circle with shading.) Then click the eyeball on the right. The image will shift to red (this helps to see where you're selecting to colorize.) The numbers in the middle should be at zero unless you want a pastel look then tinker around at 25. If you oops while drawing with your fingertip, turn it back to 100 to erase the oops.
- if at any time, you want to see how it's going click the eyeball icon again.
😮‍💨 My fingers are tired now...
Stunning and great tutorial!
 
Selective Coloring using Snapseed...
📷

-Shoot the photo in color.
-Open the photo in Snapseed, go to Tools, select Tune Image.
-Turn the saturation all the way down to 0 and fiddle with anything else while here (Shadows,Light, etc.) Click the checkmark to save progress.
- Click the Edit Stack mark (looks like a curved arrow at the upper right.) Then select View Edits.
- Bottom right now, click on Tune Image, then the square with a paintbrush.
- Far left now, Click the Invert icon. (Looks like a half circle with shading.) Then click the eyeball on the right. The image will shift to red (this helps to see where you're selecting to colorize.) The numbers in the middle should be at zero unless you want a pastel look then tinker around at 25. If you oops while drawing with your fingertip, turn it back to 100 to erase the oops.
- if at any time, you want to see how it's going click the eyeball icon again.
😮‍💨 My fingers are tired now...
giphy.gif
 
Selective Coloring using Snapseed...
1000022177-jpg.2411185


-Shoot the photo in color.
-Open the photo in Snapseed, go to Tools, select Tune Image.
-Turn the saturation all the way down to 0 and fiddle with anything else while here (Shadows,Light, etc.) Click the checkmark to save progress.
- Click the Edit Stack mark (looks like a curved arrow at the upper right.) Then select View Edits.
- Bottom right now, click on Tune Image, then the square with a paintbrush.
- Far left now, Click the Invert icon. (Looks like a half circle with shading.) Then click the eyeball on the right. The image will shift to red (this helps to see where you're selecting to colorize.) The numbers in the middle should be at zero unless you want a pastel look then tinker around at 25. If you oops while drawing with your fingertip, turn it back to 100 to erase the oops.
- if at any time, you want to see how it's going click the eyeball icon again.
😮‍💨 My fingers are tired now...
What s beutiful picture
 
😊 Thank you kindly, hon.

Thanks! I swear, it's the direct downward angle shot. I couldn't use the ceiling fan like @Lmizzler suggested. I ended up putting a kitchen chair on top of the bed, set a laundry basket ontop of it, extended out the tripod fully to hang off the bed, then used a large throw to hold the tripod down. 😅
well however it was accomplished it is an amazing picture
 
Selective Coloring using Snapseed...
1000022177-jpg.2411185


-Shoot the photo in color.
-Open the photo in Snapseed, go to Tools, select Tune Image.
-Turn the saturation all the way down to 0 and fiddle with anything else while here (Shadows,Light, etc.) Click the checkmark to save progress.
- Click the Edit Stack mark (looks like a curved arrow at the upper right.) Then select View Edits.
- Bottom right now, click on Tune Image, then the square with a paintbrush.
- Far left now, Click the Invert icon. (Looks like a half circle with shading.) Then click the eyeball on the right. The image will shift to red (this helps to see where you're selecting to colorize.) The numbers in the middle should be at zero unless you want a pastel look then tinker around at 25. If you oops while drawing with your fingertip, turn it back to 100 to erase the oops.
- if at any time, you want to see how it's going click the eyeball icon again.
😮‍💨 My fingers are tired now...
I could frame this and put it on my wall because it is truly a glorious work of art!
 
Selective Coloring using Snapseed...


-Shoot the photo in color.
-Open the photo in Snapseed, go to Tools, select Tune Image.
-Turn the saturation all the way down to 0 and fiddle with anything else while here (Shadows,Light, etc.) Click the checkmark to save progress.
- Click the Edit Stack mark (looks like a curved arrow at the upper right.) Then select View Edits.
- Bottom right now, click on Tune Image, then the square with a paintbrush.
- Far left now, Click the Invert icon. (Looks like a half circle with shading.) Then click the eyeball on the right. The image will shift to red (this helps to see where you're selecting to colorize.) The numbers in the middle should be at zero unless you want a pastel look then tinker around at 25. If you oops while drawing with your fingertip, turn it back to 100 to erase the oops.
- if at any time, you want to see how it's going click the eyeball icon again.
😮‍💨 My fingers are tired now...
I am a huge fan of your monochrome photos. You do such great work with the dark palette. But I love the little hints of color just sing here. It is just beautiful.

Then reading how much work goes into something you make look so effortless is a revelation. From the software work to your amazing creativity in setting up your camera rig, there is such work and artistry to what you do. For most things, looking behind the scenes takes some of the magic out. In your case, it enhances it all. Thank you

And beyond it all, you are a gorgeous woman. In every way.
 
In this pic I wanted something to capture the feeling of what someone would see if they were to walk in while I was lying on my bed after my bath.

I let my head fall a bit off the edge of the bed and shot the pic pretty level with my body. I blurred the background a bit with the PicsArt app and added a filter to make the colors a bit softer. Voila.
View attachment 2411159

Hi. Are you new here? PM me for my digits. You remind me of someone.
 
Selective Coloring using Snapseed...
1000022177-jpg.2411185


-Shoot the photo in color.
-Open the photo in Snapseed, go to Tools, select Tune Image.
-Turn the saturation all the way down to 0 and fiddle with anything else while here (Shadows,Light, etc.) Click the checkmark to save progress.
- Click the Edit Stack mark (looks like a curved arrow at the upper right.) Then select View Edits.
- Bottom right now, click on Tune Image, then the square with a paintbrush.
- Far left now, Click the Invert icon. (Looks like a half circle with shading.) Then click the eyeball on the right. The image will shift to red (this helps to see where you're selecting to colorize.) The numbers in the middle should be at zero unless you want a pastel look then tinker around at 25. If you oops while drawing with your fingertip, turn it back to 100 to erase the oops.
- if at any time, you want to see how it's going click the eyeball icon again.
😮‍💨 My fingers are tired now...
Great pic!!
 
In this pic I wanted something to capture the feeling of what someone would see if they were to walk in while I was lying on my bed after my bath.

I let my head fall a bit off the edge of the bed and shot the pic pretty level with my body. I blurred the background a bit with the PicsArt app and added a filter to make the colors a bit softer. Voila.
View attachment 2411159
Wow!! That’s beautiful, both the pic and you!!
 
I snapped a photo while my hubby got me some ice cream. 🤣 I have to grab the opportunities when they present themselves😉
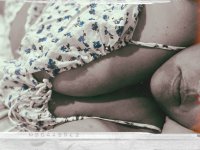
@JustAnotherFlower tasked us with selective color. I used PicsArt and a selective color tool, chose the blue of the flowers in my jammies and then ran a paper filter to get the Polaroid effect. I added a little noise to make it look more grainy and here you go.
I'm glad I got a minute to try the challenge!
EB0F9050-DC37-432A-9D18-A94C0F2446F4.jpeg
 
I snapped a photo while my hubby got me some ice cream. 🤣 I have to grab the opportunities when they present themselves😉
@JustAnotherFlower tasked us with selective color. I used PicsArt and a selective color tool, chose the blue of the flowers in my jammies and then ran a paper filter to get the Polaroid effect. I added a little noise to make it look more grainy and here you go.
I'm glad I got a minute to try the challenge!
View attachment 2411489
Great shot!!
 
I snapped a photo while my hubby got me some ice cream. 🤣 I have to grab the opportunities when they present themselves😉
@JustAnotherFlower tasked us with selective color. I used PicsArt and a selective color tool, chose the blue of the flowers in my jammies and then ran a paper filter to get the Polaroid effect. I added a little noise to make it look more grainy and here you go.
I'm glad I got a minute to try the challenge!
View attachment 2411489
This is so beautiful and atmospheric, the effects really add something, and those lips 😍. 🥰
 
Last edited:
Back
Top